- Article
- Related
The main—if not the sole—purpose of reverse engineering is to gain knowledge about the design and development steps shrouded in the guise of a finished product. But what is backwards engineering if not a means to address practical issues such as machine downtime, part replacement, and maintenance or repair challenges?
Implementing a reverse engineering process is the starting point of a knowledge transmission model. In the present, it helps solve production problems; the main advantage is to create and safeguard knowledge for the future. Reverse engineered parts and products generate critical data and design information for the benefit of future product development endeavours, MRO, and spare part availability.
Let’s keep in mind that it’s never too late to learn the ropes of something. That is why we put together this piece that acts as a step-by-step product reverse engineering guide for beginners.
Here is How We Recommend to Begin with Product Reverse Engineering
The Product—Figure Out What Product You Want to Reverse Engineer
Most of the time, this just goes without saying. Let’s use our imagination and think of a loudspeaker manufacturer that produces pretty much all components of the speaker assembly itself, except for a few, namely the basket, made by Supplier A.
Supplier A is acquired by Company X. Company X also manufactures the speaker basket, but the fit is not exactly right anymore. Then Company X goes bankrupt. In theory, all hope is gone. Meaning that no matter how hard you try to find an exact equivalent of the original part, you would have to bypass the knowledge transmission barrier inside both entities, be able to retrieve former designs that would have miraculously survived the acquisition and potential relocation, and much more, while making sure the whole process does not infringe patent rights and remains up to ISO standards.
The original basket design was most likely lost in the acquisition process, and Company X’s design is not up to the quality standards of the loudspeaker manufacturer.
The solution? Let’s reverse engineer the basket—and the entire loudspeaker, for that matter—and bring the entire production process in-house.
The Research—Do Your Research and Make Sure You Understand How the Product Works
You are no stranger to your product, but the simple fact that some of its components were manufactured by a third-party supplier reshuffles the whole deck. Understanding how the product works based on the individual role played by each part gives you complete control over what can be done in the now (e.g., go back in production phase), in the near future (e.g., product improvements), and in the long run (e.g., product development based on earlier designs).
What are the implications of redesigning the component (i.e., the basket) via reverse engineering techniques? You need to gather as much information as possible: component fit and orientation, size, material, attachments and relation to other parts (e.g., electrical, mechanical, acoustic, etc.), compatibility, and so on. In fact, this process will probably make you rethink every single aspect of the product. What about this bracket? Let’s model it too.
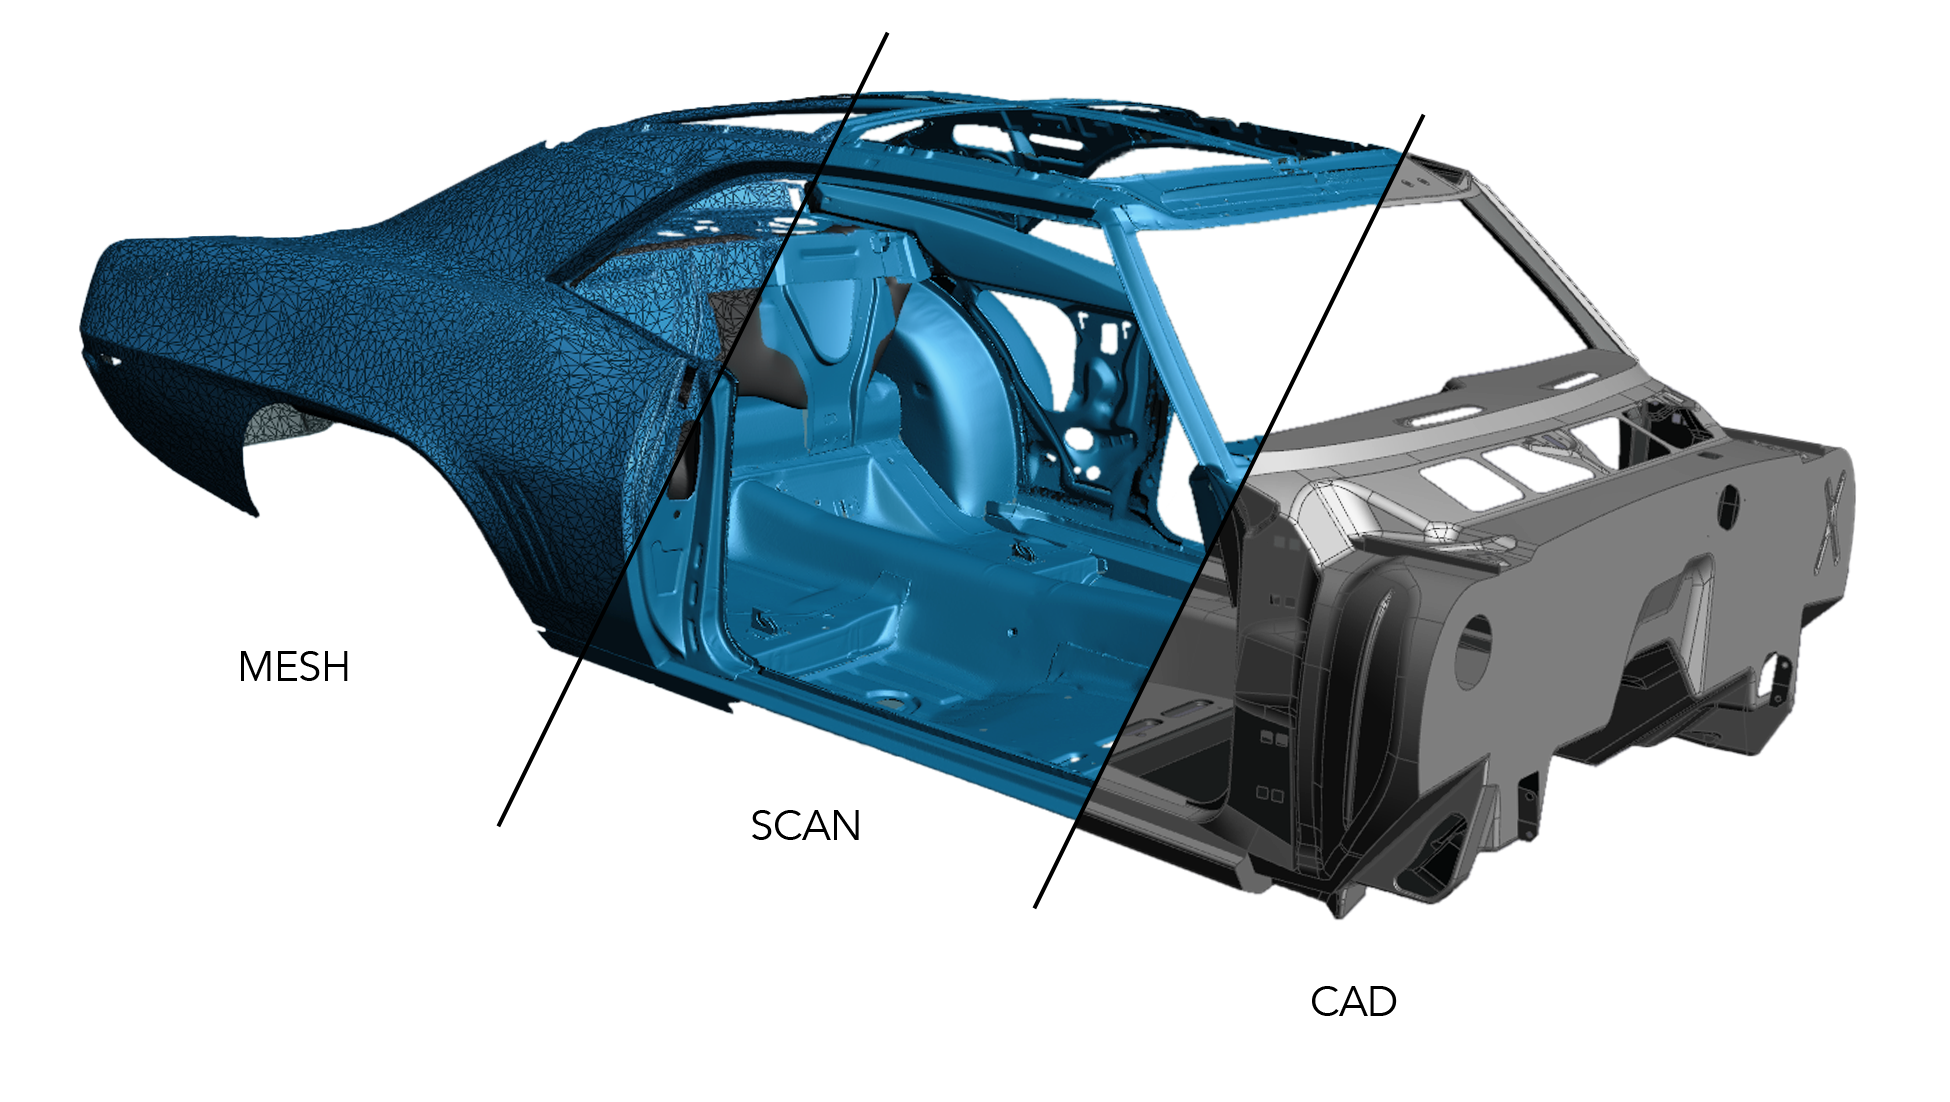
 Reverse engineering using 3D scanning enables automotive manufacturers to analyze, control and replicate existing parts for repairs or improvements.
 The Plan—Create a Plan for How You Will Go About Reverse Engineering the Product
Even though prolonged production downtime can put tremendous pressure on sales and shipping, the real enemy is the lack of scrutiny when thinking about how you will go about backwards engineering the loudspeaker.Although the ultimate goal is to get enough data to design and produce the basket-and-bracket assembly, there’s not good reason to make haste. A carefully planned out disassembly of the product is in order. But that’s not all: what reverse engineering methodology will you be using? Consultancy or in-house? Traditional measuring tools or 3D scanning technology? Where will you store the data? Who will be in charge? What will you do with the actual data? What is the endgame? Knowing the answers to most of these questions will prove invaluable for future product development and design endeavours.
The Dissection—Begin Taking the Product Apart and Understanding How It Is Put Together
Some say this is the fun part. The discovery and unearthing of product and component information is what makes this step a wonder comparable to archaeological findings. While this may have been somewhat of a stretch, taking the product apart and scanning its components reveal critical information that has gotten lost since the original design—due to broken data storage infrastructure, paper-to-electronic migration, and what not.The best way to go about is to inspect every nook and cranny, making sure nothing is left to chance. It’s one part component specs, and one part how they are put together to form the product. There is always room for improvement in both cases—more on that later.
Advanced technologies such as 3D scanning can be an important part of a product reverse engineering project. Dissecting the product is one thing, but getting the raw data as to the mechanical specifications, connections, positioning, friction points, load bearing, etc. brings the data to a whole other level, and 3D scanning is one efficient way of extracting these data.
In our case, the critical information revolves around getting as much information as possible about the basket-and-bracket assembly. The best route is to scan former designs of the loudspeaker components, if available. Another approach would be to accurately measure everything that’s in place to fill the void left by the basket assembly.
The Model—Create a Model or Prototype of the Product
You have the data. Now what?The now digitized product data acts as a blueprint of the components and product in their current state. Hence the name “reverse engineering”: You take a finished product and backtrack until you get to the preliminary design stage.
The data can then be further inspected using specialized or generic software to reveal areas of improvement, recover mechanical specifications that may have gotten lost due to various reasons, secure component properties in a digital format that can be stored, shared, versioned and processed. This in turn allows engineers to remodel the components and product, and to build a prototype that takes the newly acquired information into consideration to solve initial challenges. As mentioned before, reverse engineering addresses the “now” problems, and gives you the flexibility to adapt to upcoming product designs, changes, improvements and developments.
 Product development process: helmet 3D model
 The Testing (and Refinement)—Test and Refine Your Model or Prototype
This step speaks for itself; it basically means bringing the digital assembly into the practical world, testing it and making sure it meets all the expectations set out at the very start of the reverse engineering process.What are the indicators of quality? How does the product compare to former designs? What about the potential effects of harsh environmental conditions, vibrations, heat, pressure, repeated or intensive use replicated via cycle testing? Even if former version of the product didn’t go through every single step of testing and refinement, this becomes the key step to making sure you (re)launch the production of a research-informed product, based on actionable data.
Any discrepancy between the tested material and the expectations of the final product has to be brought to the drawing board for refinement purposes.
The Findings—Put Together a Report or Presentation of Your Findings
Since reverse engineering a component, assembly or product is no small feat, the whole process needs to be vetted at its starting point, and reviewed at the end. We cannot stress enough the importance of documenting everything from point A to point Z—failing to do so is a recipe for another blueprint or another dataset going astray, resulting in yet another production halt at the plant. Your report or presentation should include:
- Root cause
- Intended use of the product at the end of the process
- Reverse engineering methodology
- Issues experienced
- Areas for improvement
- Suggestions, highlights, overall experience
In the end, the report or presentation should be an integral part of the knowledge transmission mechanism used by your company to prevent the loss of critical information.
Continuous Improvement and Alternate Solutions
Reverse engineering can be performed in various ways, and problems such as the loudspeaker basket unavailability can be solved with solutions other than reverse engineering. In the scope of things, an optimal product (re)development cycle requires strategy, a sense of delivery, value-adding tasks, great communication and minimal waste—and that is where traditional reverse engineering methods usually fail.
Advanced methods and patented technologies such as 3D scanning instruments and software can be leveraged to save time and reallocate resources to value-added work. The faster the resolution, the better the chances of getting your production development process back on track.
Advanced methods and patented technologies such as 3D scanning instruments and software can be leveraged to save time and reallocate resources to value-added work. The faster the resolution, the better the chances of getting your production development process back on track.


Article written by Creaform
Published 05/15/2023
Published 05/15/2023
Recent Posts
Filters
Reset