- Article
- Related
Since its foundation in 1978 in Gyeongsan, South Korea, Ajin Industrial has become a cornerstone supplier of high-volume automotive body-in-white components. Serving Hyundai and Kia for over forty years, the company manufactures an extensive range of structural press-formed parts—including dashboard panels, front apron assemblies, rear quarter panels, and side-frame reinforcements—engineered to meet the strict dimensional requirements of modern automotive manufacturing.
This blog explores Ajin Industrial’s journey from manual, operator-dependent inspection to an automated quality control process that now delivers faster, more repeatable, and more accurate results for mass-produced automotive parts.
Limitations Behind Traditional Fixture-Based Inspection
Before adapting its inspection workflow, Ajin Industrial relied on conventional inspection fixtures (I/F) to verify the dimensions of its stamped body components. While these fixtures had served their purpose for years, they introduced limitations as product geometries became more complex and production volumes increased.
Large variations in measurement results
Because the inspection process was highly manual, measurement results frequently deviated from expected trend data. These discrepancies could originate from multiple factors—fixture constraints, inconsistent positioning, or operator judgment—ultimately creating gaps between the actual part geometry and the dimensional trend the company needed to monitor.
Need for a more reliable, operator-independent inspection method
To maintain quality and support its role as a trusted Tier-1 supplier to the Hyundai Motor Group, Ajin Industrial needed a faster and more repeatable measurement method. The goal was clear: shorten dimensional inspection time, reduce operator-induced variation, and adopt a new technology that would deliver reliable results regardless of who performed the measurement.
Ajin Industrial’s Transition to Automated Quality Control
Selecting a Reliable, Operator-Independent Technology
3D scanning quickly emerged as the most suitable technology. It offered the combination of accuracy, repeatability, and speed needed for high-volume automotive manufacturing, along with a user-friendly workflow that minimized the learning curve. Ajin Industrial particularly valued:
- High accuracy and repeatability for reliable dimensional measurements
- Fast measurement speed and real-time feedback to accelerate inspection cycles
- Ease of use that enabled any trained operator to perform measurements confidently
Given its current use of PolyWorks, Ajin Industrial also sought a solution that integrated seamlessly into its existing environment.
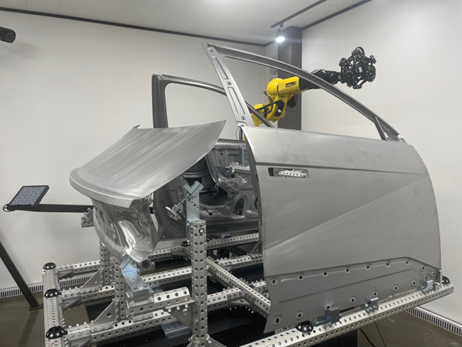
This led to the selection of the Creaform CUBE-R, an industrial measuring cell designed for high-speed scanning and repeatable inspection.
Integrating the CUBE-R system into our mass-production line has increased measurement repeatability and advanced the automation of our quality control.
Thanks to its fast measurement speed, high accuracy, and ease of use, our quality inspection efficiency has improved significantly.
-Do-hyun Ko, Engineer at Ajin Industrial
Smooth, Well-Planned Implementation
Creaform’s team conducted a preliminary on-site assessment to understand Ajin’s workflow and inspection requirements. Based on this evaluation, they recommended an equipment configuration and cell layout tailored to the production environment.
Structured Onboarding for Rapid Adoption
Ajin Industrial also benefited from a hands-on training program built around real shop-floor scenarios. As a result, operators became comfortable with basic operation and measurement tasks within two to three days, and were able to perform application work within one to two weeks.
Easy Programming for Operators of All Skill Levels
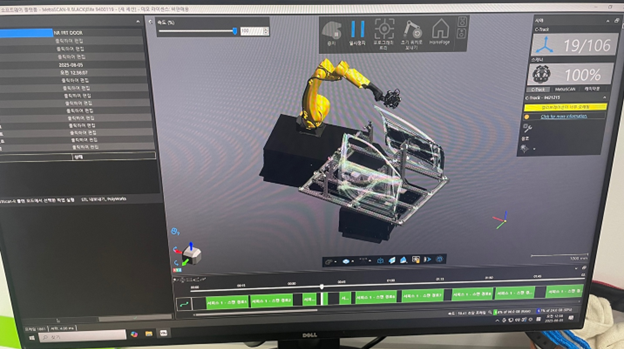
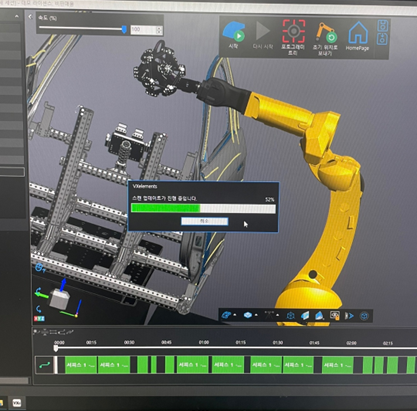
Ajin Industrial was looking for a comprehensive software solution that would make the entire process—from programming to offline simulation and execution—easy and straightforward. The Creaform Metrology Suite delivers exactly that, providing a seamless, easy-to-follow workflow for operators of all experience levels. Its intuitive interface and guided steps made onboarding fast and accessible—even for those new to robotics and 3D scanning.
Results Achieved with the CUBE-R
By introducing automated quality control with the CUBE-R, Ajin Industrial strengthened both the speed and reliability of its dimensional inspection workflow. The new solution delivers measurable improvements across accuracy, productivity, and communication with customers.
Minimized Measurement Deviation for More Accurate Quality Control
The CUBE-R provides significantly lower measurement deviation than visual inspection or manual fixture-based methods. Its high repeatability ensures reliable results—critical for root-cause analysis during early mass production and whenever dimensional issues arise. With consistent, data-driven measurements, Ajin Industrial can quickly validate part quality and maintain tighter control over production trends.
Enhanced Productivity With Shorter Measurement Time
Automated quality control dramatically accelerates the inspection process compared to manual techniques. Real-time feedback enables rapid decision-making and immediate corrective action on the production line. Because measurement programs are repeatable, the robotic system can also run unattended—including overnight—improving productivity and flexibility.
Stronger Quality Tracking and Customer Communication
All 3D data is stored digitally, enabling detailed statistical analysis, long-term trend monitoring, and clear before-and-after comparisons. This data-rich approach strengthens Ajin Industrial’s internal quality tracking and enhances communication with customers by providing objective, visual evidence of product conformity.
Consistent Quality and Cost Reduction Through Reduced Personnel Dependency
By reducing reliance on individual inspectors and eliminating inter-operator variation, Ajin Industrial achieves more consistent measurement quality across shifts and teams. Anyone following the established process can perform accurate inspections, minimizing personnel-related risks, lowering management costs, and reducing the potential for fatigue-related human error.
By identifying defects earlier, overall production stability and customer confidence have increased.
-Do-hyun Ko, Engineer at Ajin Industrial
Ajin Industrial’s Path to Quality Control Efficiency
Meeting the ambitious requirements for accuracy, speed, and repeatability would have been extremely difficult—if not impossible—using previous measurement methods. Traditional tools simply could not deliver the quality inspection efficiency necessary to support high-volume mass production.
By implementing the CUBE-R, Ajin Industrial successfully achieved all of its targets. The robotic system provides the accuracy and scanning speed required, but more importantly, it delivers the repeatable, automated measurements essential for maintaining consistent quality across large production volumes.
Today, Ajin Industrial relies on Creaform’s automated 3D scanning solutions as a core component of its mass-production quality control strategy. Their success with the CUBE-R reinforces their trust in Creaform, and they plan to expand the use of the robotic system to future products and inspection programs.
Published 01/16/2026


